Have you ever looked at a deck or porch and thought “what the heck?!” We had a side porch/deck like that. Until recently, that is.
A little backstory…Before we bought this house, the previous owners installed a small (8′ x 10′) deck off the side door. It covered what remained of a wide concrete stoop, 4 steps. Rather than removing the steps, the builder nailed the boards that covered the steps into the steps. As a result the boards warped over time, so much so that we couldn’t open the door to the kitchen. DH took up the boards, cut off the warped parts and laid them back down again, revealing the top concrete step. We put a thick rubber mat in the space until we could redo the entire thing. Besides all the trouble with the top of the decking, the entire structure was never secured to anything but the concrete blocks it was set upon. No ledger board, nothing. So it leaned and canted in several different directions. On top of that, the railings were installed incorrectly (pre-formed rails made for a totally different application.) And they weren’t high enough to meet railing codes.
That’s what we started with when we decided to renovate.

We had to remove the decking to reveal the joists and discover just what we had to do.
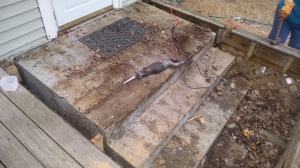
The concrete steps that were left behind. No joists were used to support the boards closest to the house. The depth was more than the thickness of the boards hence the bowing.
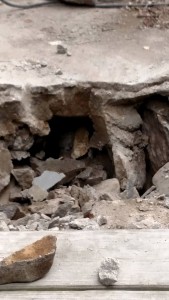
Jackhammering the top few steps revealed a cavern of concrete and rubble!! DH rented a hammer drill from a local hardware store. Not something we keep on hand and it’s not a job he wants to do for a living. Makes me respect those guys on the highway even more!

Now we had room to install new, solid joists. We used metal holders, galvanized screws (not nails) and installed the boards, covering the remaining steps.


Then we found the rotten posts.


Replacing the posts. DH was able to remove some of the carriage bolts (some posts were just screwed in with huge screws, not bolts) and had to cut out the remaining wood so that he could refit the new posts. Those were bolted to the joists and then the remaining deck boards were screwed down.


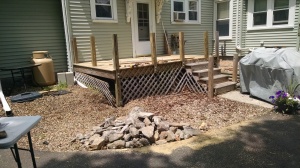
The beginning of the railings. … and the finished product. These are at the correct height. The rails are 2x4s screwed onto the posts. The 2x2s were screwed onto those. We used deck boards for the top railing. They’re smooth and just the right width for a beer or glass of wine. Or a flower pot. 🙂

Remaining chores:
- Add a post to the right of the new deck, more for asthetics than anything
- Replace the stringers and steps. We bought some grooved stair treads for the steps that are already grooved for water/weather.
- Replace the lattice to keep out the skunks.
- Build a platform deck to the right of the original deck. It will be one step down from the current deck and will cover the graveled area.
More pics to come.
Lesson learned here: Don’t hire a doofus to build a deck.

1 thought on “About decks”